Tech pack — czym jest, co zawiera i jak go przygotować przed pierwszą produkcją
Tech pack to najważniejszy dokument w procesie produkcji odzieży. Bez niego producent musi zgadywać — a każde domysły kosztują Cię czas i pieniądze. Wyjaśniamy co powinien zawierać i jak go przygotować nawet bez doświadczenia w branży.
Zespół BalticThread·17 marca 2026·8 min czytania
Czym jest tech pack i dlaczego jest niezbędny
Tech pack (skrót od technical package) to dokumentacja techniczna produktu odzieżowego — zestaw wszystkich informacji, które producent potrzebuje, żeby uszyć dokładnie to, co chcesz. Zawiera szkice, specyfikacje tkanin, tabelę rozmiarów, instrukcje znakowania i opisy wykończeń.
Bez tech packa producent robi prototyp na podstawie swojej interpretacji Twojego opisu. To samo zdanie może oznaczać zupełnie różne produkty dla różnych krawcowych. "Bluza dresowa z kapturem" to dla Ciebie kolekcja premium z podwójnym kapturem, flatlockiem i haftem na klatce — a dla producenta może to być baza z hurtowni z naszytą metką. Różnica między efektem a oczekiwaniem to koszt kolejnej rundy prototypu.
Fakty z produkcji
Marki które przychodzą do nas z kompletnym tech packiem przechodzą średnio 1–2 rundy prototypu. Marki bez dokumentacji — od 3 do 5 rund. Każda runda kosztuje 150–400 zł i 10–15 dni roboczych. Inwestycja w dobry tech pack zwraca się po pierwszym prototypie.
Co musi zawierać dobry tech pack
Tech pack nie musi być profesjonalnym dokumentem z dziesiątkami stron. Musi być kompletny i jednoznaczny. Oto elementy, które powinny znaleźć się w każdym tech packu:
Element 01
Szkic techniczny (flat sketch)
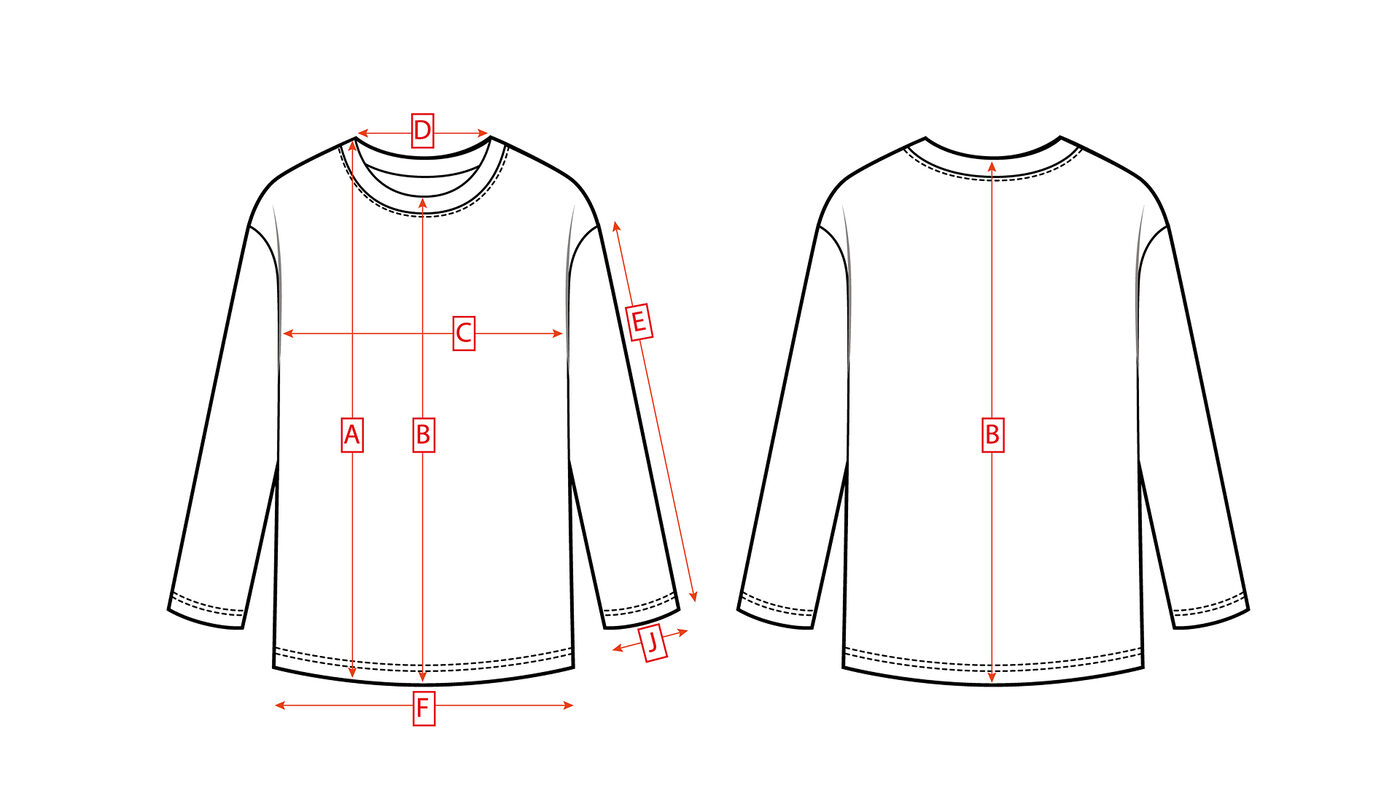
Widok z przodu i z tyłu produktu z zaznaczonymi detalami: kieszeniami, zamkami, szwami ozdobnymi, wzmocnieniami. Nie musi być profesjonalny — może być odręczny, o ile wszystkie detale są wyraźnie widoczne i opisane.
Element 02
Tabela rozmiarów (measurement chart)
Konkretne wymiary w centymetrach per rozmiar: obwód klatki, talii, bioder, długość całkowita, długość rękawa, szerokość ramion. To jest absolutna podstawa — bez niej producent szyje "w rozum".
Element 03
Specyfikacja tkaniny
Skład procentowy (np. 88% poliester, 12% elastan), gramatura w g/m², rodzaj splotu (interlock, single jersey, fleece, mesh). Jeśli wybierasz tkaninę z próbnika producenta — numer referencyjny tkaniny.
Element 04
Akcesoria i wykończenia (trims)
Rodzaj i kolor zamków (z nazwą dostawcy jeśli masz preferencję), taśmy gumowe i sznury, rodzaj nici, napy, rzepy, haczyki, uchwyty do suwaków. Każdy detal, który ma znaczenie dla wyglądu lub funkcjonalności produktu.
Element 05
Instrukcja znakowania i packagingu
Typ znakownia (haft, DTF, sitodruk), umiejscowienie logo z wymiarami i odległościami od szwów, kolory znakowania. Metki: tkane czy drukowane, treść metki pielęgnacyjnej (skład i instrukcja prania), pozycja metki w produkcie.
Element 06
Zdjęcia referencyjne
Zdjęcia podobnych produktów z rynku pokazujące krój, detal lub wykończenie które Ci się podoba. Producent widzi w sekundę co masz na myśli. Warto zaznaczyć co chcesz skopiować a czego uniknąć.
Szkice techniczne — jak je przygotować
Nie musisz być projektantem odzieży, żeby zrobić dobry szkic techniczny. Oto trzy podejścia w kolejności od najprostszego:
Odręczny szkic z opisami: narysuj model z przodu i z tyłu, zaznacz strzałkami wszystkie detale z opisem. "Kieszeń zapinana na zamek YKK" jest lepsza niż najpiękniejszy rysunek bez podpisów. Zrób zdjęcie lub zeskanuj.
Szkic w programie Canva lub Figma: szablony flat sketch dla podstawowych produktów (t-shirt, hoodie, spodenki) są dostępne za darmo. Możesz narysować na szablonie i opisać detale.
Szkic z referencją z Adobe Illustrator: jeśli masz dostęp do Illustratora lub znasz kogoś kto ma — flat sketch w AI daje największą precyzję. Producent może na nim zaznaczyć własne uwagi.
Praktyczna wskazówka
Jeśli nie masz szkicu — wyślij nam zdjęcia 2–3 istniejących produktów z rynku i powiedz co chcesz skopiować (krój), co zmienić (detale) i co dodać (znakowanie). Na podstawie takich referencji możemy przygotować dokumentację po stronie naszej i wysłać Ci do zatwierdzenia przed prototypem.
Tabela rozmiarów i wymiary
Tabela rozmiarów to jeden z elementów, który najczęściej brakuje albo jest źle przygotowany. "Rozmiar M" to nie jest wymiar — to etykieta, która w różnych branżach i u różnych producentów oznacza inne liczby. Producent szyje pod konkretne centrymetry, nie pod literę.
Minimalny zakres wymiarów dla kolekcji sportowej:
Obwód klatki piersiowej — mierzony w najszerszym miejscu, po obu stronach
Obwód talii — dla produktów z gumką lub paskiem
Długość całkowita — od barku do dołu (górne) lub od gumki do dołu (dolne)
Długość rękawa — od barku do mankietu lub nadgarstka
Szerokość ramion — od szwu do szwu przez barki
Obwód szyi — dla produktów z kołnierzem lub półgolfem
Podaj wymiary dla każdego rozmiaru osobno (S, M, L, XL, XXL). Producent ma wtedy twarde dane do szycia i możesz precyzyjnie ocenić prototyp — czy wymiary się zgadzają, a nie czy "siedzi dobrze na oku".
Specyfikacja tkanin i akcesoriów
Jeśli wybierasz tkaninę samodzielnie (model CMT), dostarcz jej próbkę do producenta razem z tech packiem. Jeśli producent kupuje tkaninę za Ciebie (Full Package), im precyzyjniej określisz parametry, tym mniej czasu zajmie sourcing i mniejsze ryzyko pomyłki.
Podstawowe parametry tkaniny do określenia:
Skład: np. 92% bawełna / 8% elastan — to wpływa na rozciągliwość, trwałość i pielęgnację
Gramatura: podana w g/m² — lekkie koszulki to 130–180 g/m², bluzy dresowe 280–340 g/m², ocieplenia fleece 200–280 g/m²
Struktura splotu: single jersey (cienki, elastyczny), interlock (grubszy, stabilniejszy), french terry (dres), mesh (siatka, oddychający)
Kolor: pantone lub próbka — "granatowy" to nie jest kolor
Certyfikat: czy tkanina musi mieć Oeko-Tex, GOTS lub inny certyfikat
Nie masz tech packa — pomożemy go zrobić
Na podstawie Twoich zdjęć referencyjnych przygotujemy dokumentację techniczną przed prototypem.
Znakowanie to często najbardziej niedookreślona część tech packa — a to właśnie ono decyduje o tym, czy produkt wygląda jak gotowa marka, czy jak baza z hurtowni.
Logo i znakowanie zewnętrzne: określ technikę (haft komputerowy, nadruk DTF, sitodruk), pozycję (np. "środek klatki piersiowej, 7 cm od dołu dekoltu"), wymiary loga (szerokość w cm), kolory (pantone lub kody CMYK/RGB). Plik loga dostarcz w formacie wektorowym (AI, EPS, PDF).
Metka składu i pielęgnacji: musi zawierać skład tkaniny (zgodnie z wymogami UE), instrukcję prania (symbole ISO), kraj produkcji ("Made in Poland"), rozmiar. Metka może być tkana lub drukowana — tkane są trwalsze i lepiej wyglądają w odzieży premium.
Packaging: czy produkt trafia do polybaga, na hantajgu, w pudełku? Czy hantajg ma nadruk logo? Czy polybag ma sticker z rozmiarem i kodem? Każdy z tych elementów ma cenę i musi być uwzględniony w budżecie.
Jak przygotować tech pack bez designera mody
Większość nowych marek nie ma w zespole designera odzieżowego — i to jest normalne. Tech pack można przygotować samodzielnie krok po kroku:
Krok 1 — zebraj referencje: znajdź 3–5 istniejących produktów na rynku (zdjęcia ze sklepów, Alibaba, Instagram marek), które najbardziej przypominają Twój produkt. Zaznacz co lubisz, a co chcesz zmienić.
Krok 2 — narysuj model: prosty szkic odręczny widok przód/tył z opisanymi detalami. Nie musi być ładny — ma być czytelny.
Krok 3 — zmierz siebie lub wzorcowe produkty: weź produkt z rynku, który ma krój który lubisz, i zmierz go płasko na stole. Utwórz tabelę rozmiarów wokół tych wymiarów.
Krok 4 — opisz tkaninę: idź do hurtowni dzianin lub poproś producenta o próbnik. Wybierz tkaninę dotykając ją fizycznie — żadne zdjęcie nie oddaje chwytliwości materiału. Zapisz numer referencyjny.
Krok 5 — przygotuj logo w wektorze: jeśli masz logo w JPG lub PNG — poproś grafika o konwersję do AI lub EPS. To koszt 50–200 zł i jest niezbędne do haftu lub sitodruku.
Najczęstsze błędy w tech packach
Czego unikać w tech packu
Brak wymiarów per rozmiar — "standardowa rozmiarówka" nie istnieje, każdy producent ma swoją
Logo w JPG lub PNG bez wektora — nie nadaje się do haftu ani sitodruku
Opis koloru bez kodu pantone — "ciemnogranatowy" nie jest specyfikacją techniczną
Brak specyfikacji tkaniny — "coś miękkiego i oddychającego" to opis emocji, nie materiału
Brak pozycji znakowania z wymiarami — "logo na piersi" bez centymetrów daje luzem od 5 do 15 cm odchylenia
Wysyłanie tech packa mailem jako 10 osobnych wiadomości — zbierz całość w jeden PDF lub folder ZIP
Z naszego doświadczenia
Dobry tech pack może przygotować każdy kto ma trochę cierpliwości i zdrowy rozsądek. Nie musisz znać terminologii branżowej — wystarczy że będziesz precyzyjny. Jeśli masz wątpliwości co do jakiegoś elementu, napisz do nas — odpowiemy co jest potrzebne.
Gotowy na pierwszą produkcję?
Wyślij nam brief lub tech pack — odpowiemy z wyceną i terminami w 24h.
A tech pack (short for technical package) is the technical documentation for a garment — the complete set of information a manufacturer needs to produce exactly what you want. It includes flat sketches, fabric specifications, a size chart, branding instructions, and finish descriptions.
Without a tech pack, the manufacturer builds a prototype based on their own interpretation of your description. The same sentence can mean completely different products to different pattern cutters. "A hooded sweatshirt" might mean a premium piece with a double-layer hood, flatlock seams, and an embroidered chest logo to you — but to the manufacturer it may mean a wholesale base with a sewn-in label. The gap between what you expected and what you receive is the cost of another prototype round.
Production facts
Brands that come to us with a complete tech pack average 1–2 prototype rounds. Brands without documentation need 3 to 5. Each round costs 150–400 PLN (approx. €35–100) and 10–15 working days. The investment in a good tech pack pays for itself after the first prototype.
What a good tech pack must contain
A tech pack does not need to be a polished document running to dozens of pages. It needs to be complete and unambiguous. Here are the elements that must appear in every tech pack:
Element 01
Technical sketch (flat sketch)
Front and back views of the product with all details marked: pockets, zips, decorative seams, reinforcements. It does not need to be professional — it can be hand-drawn, as long as all details are clearly visible and labelled.
Element 02
Size chart (measurement chart)
Specific measurements in centimetres per size: chest circumference, waist, hips, total length, sleeve length, shoulder width. This is the absolute baseline — without it the manufacturer is sewing by guesswork.
Element 03
Fabric specification
Percentage composition (e.g. 88% polyester, 12% elastane), weight in g/m², knit structure (interlock, single jersey, fleece, mesh). If you are selecting fabric from the manufacturer's swatch book — the fabric reference number.
Element 04
Accessories and trims
Zip type and colour (with supplier name if you have a preference), elastic tapes and drawcords, thread type, press studs, hook-and-loop fasteners, zip pulls. Every detail that affects the appearance or functionality of the product.
Element 05
Branding and packaging instructions
Decoration technique (embroidery, DTF, screen printing), logo placement with dimensions and distances from seams, branding colours. Labels: woven or printed, care label content (composition and wash instructions), label position within the garment.
Element 06
Reference images
Photos of similar products on the market showing the cut, detail, or finish you like. The manufacturer understands in seconds what you have in mind. It is worth marking what you want to replicate and what you want to avoid.
Technical sketches — how to prepare them
You do not need to be a fashion designer to produce a good technical sketch. Here are three approaches, from simplest to most precise:
Hand-drawn sketch with annotations: draw the garment front and back, use arrows to label every detail. "Zip-fastened pocket with YKK zip" beats the most beautiful drawing with no labels. Take a photo or scan it.
Sketch in Canva or Figma: flat sketch templates for standard products (t-shirt, hoodie, shorts) are available for free. Draw on the template and annotate the details.
Adobe Illustrator flat sketch: if you have access to Illustrator or know someone who does — an AI flat sketch offers the greatest precision. The manufacturer can mark their own notes directly on it.
Practical tip
If you have no sketch — send us photos of 2–3 existing products from the market and tell us what you want to replicate (the cut), what you want to change (the details), and what you want to add (the branding). On the basis of those references we can prepare the documentation on our side and send it to you for approval before the prototype.
Size chart and measurements
The size chart is one of the elements most often missing or incorrectly prepared. "Size M" is not a measurement — it is a label that means different numbers in different industries and at different manufacturers. The manufacturer sews to specific centimetres, not to a letter.
Minimum set of measurements for a sportswear collection:
Chest circumference — measured at the widest point, across both sides
Waist circumference — for products with an elasticated waist or waistband
Total length — from shoulder to hem (tops) or from waistband to hem (bottoms)
Sleeve length — from shoulder to cuff or wrist
Shoulder width — seam to seam across the shoulders
Neck circumference — for products with a collar or mock-neck
Provide measurements for each size individually (S, M, L, XL, XXL). The manufacturer then has hard data to sew to, and you can assess the prototype precisely — checking whether measurements match, rather than whether it "looks about right".
Fabric and trims specification
If you are supplying the fabric yourself (CMT model), deliver a sample to the manufacturer together with the tech pack. If the manufacturer is sourcing the fabric for you (Full Package), the more precisely you define the parameters, the less time sourcing takes and the lower the risk of error.
Core fabric parameters to specify:
Composition: e.g. 92% cotton / 8% elastane — this affects stretch, durability, and care
Weight: stated in g/m² — lightweight jerseys are 130–180 g/m², sweatshirt fleece 280–340 g/m², fleece linings 200–280 g/m²
Knit structure: single jersey (thin, stretchy), interlock (thicker, more stable), French terry (sweatshirt), mesh (open, breathable)
Colour: Pantone reference or physical swatch — "navy" is not a colour specification
Certification: whether the fabric must carry Oeko-Tex, GOTS, or another certificate
No tech pack? We will help you create one
Based on your reference images, we prepare the technical documentation before the prototype.
Branding is often the least defined part of a tech pack — yet it is exactly what determines whether a product looks like a finished brand or a blank from a wholesaler.
Logo and external branding: specify the technique (machine embroidery, DTF print, screen printing), the position (e.g. "centre chest, 7 cm below the neckline"), logo dimensions (width in cm), and colours (Pantone or CMYK/RGB codes). Supply the logo file in vector format (AI, EPS, PDF).
Composition and care label: must include fabric composition (in line with EU requirements), wash instructions (ISO symbols), country of manufacture ("Made in Poland"), and size. Labels can be woven or printed — woven labels are more durable and look better on premium garments.
Packaging: is the product going into a polybag, on a hanger tag, in a box? Does the hanger tag carry the logo print? Does the polybag get a size and barcode sticker? Each of these elements has a cost and must be included in the budget.
How to prepare a tech pack without a fashion designer
Most new brands do not have an apparel designer in the team — and that is perfectly normal. A tech pack can be prepared independently, step by step:
Step 1 — gather references: find 3–5 existing products on the market (photos from shops, Alibaba, brand Instagram) that most closely resemble your product. Mark what you like and what you want to change.
Step 2 — draw the garment: a simple hand-drawn front/back sketch with annotated details. It does not need to look nice — it needs to be legible.
Step 3 — measure yourself or reference garments: take a product from the market with a cut you like and measure it flat on a table. Build your size chart around those measurements.
Step 4 — specify the fabric: visit a fabric wholesaler or ask the manufacturer for a swatch book. Choose fabric by touching it physically — no photo conveys how a material handles. Note the reference number.
Step 5 — prepare the logo as a vector: if you have a logo in JPG or PNG format — ask a graphic designer to convert it to AI or EPS. This costs 50–200 PLN (approx. €12–50) and is essential for embroidery or screen printing.
Most common tech pack mistakes
What to avoid in your tech pack
No measurements per size — a "standard size chart" does not exist; every manufacturer uses their own
Logo supplied as JPG or PNG without a vector file — not usable for embroidery or screen printing
Colour described without a Pantone code — "dark navy" is not a technical specification
No fabric specification — "something soft and breathable" describes a feeling, not a material
No logo placement with measurements — "logo on the chest" without centimetres allows 5 to 15 cm of variation
Sending the tech pack as 10 separate emails — consolidate everything into a single PDF or ZIP folder
From our experience
A good tech pack can be put together by anyone with a little patience and common sense. You do not need to know industry terminology — you just need to be precise. If you are unsure about any element, write to us — we will tell you exactly what is needed.
Ready for your first production run?
Send us a brief or tech pack — we will reply with a quote and lead times within 24 hours.